User Tools
Sidebar
Table of Contents
Getting Started
This topic is a quick outline of how the user can create model or import a model in ACS-SASSI User Interface. The topic will also tell the user the capabilities of the user interface tools that he/she will be using during the model input into User Interface.
Creating a Model From Scratch
- Define the nodes for the structure, starting from the bottom. See the N command.
- Set the boundary conditions using the D command
- Check the elements by opening a Model Plot window by using the Plot > Model > Element menu or the Model
- Check the assigned materials and properties in the Model Plot window by showing the elements in their material / property color and comparing their color with the material / property color shown when selecting the Options > Colors menu or the Color Command.
- Set the element integration order for SOLID elements using the EINT command.
- Check the masses by displaying them in the Plot>Model>Nodes which opens the node plot window
- Set the model options by selecting the Options > Model Menu
- Define the analysis frequency set (FREQ Command)
- Define the analysis options by selecting the Options / Analysis menu command
- Run the AFWRITE command to write the analysis files for the selected modules
- Run the desired modules for the simulation
Loading and Saving Models
The way models are loaded and save has changed in ACS-SASSI User Interface. In earlier versions ACS-SASSI the user must create a database in Main then create a new empty model in Prep and and add it to the existing database before any work on a model can begin. The User Interface allows the user to work on a model without require the user to specify a place to save a model until a later time. The User Interface has a database that will be described later; unfortunately this database and model data is not compatible with the database in Main/Prep
Using the Database
The ACS-SASSI User Interface has a single two level database structure for the users computer. The single database replaces the multiple user-defined databases in the Main Prep work-flow. The single database is in a location cached by the system so the user will never have to search the directory structure to find old databases that have not been used in some time. The 2 level structure will allow the user to organize all of the models on a computer account by project much similar to how the multiple database model in the Main/Prep work-flow was intended. Finally, the database is now considered to be a convenience feature and is no longer required to use any functionality in the User Interface.
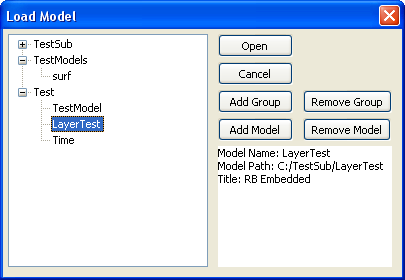
When the user attempts to open a model for the first time in the User Interface the Load Model Window tree structure will be empty. At this time the user must add a group. All models must reside within a group. If the user attempts to define a model without a group the model will not be saved in the database structure. After the user defines a group the user must select the group he/she wants to add the model to in the tree window. One the group is selected the user can press the add model button and provide the model information as they would in Prep. Once the user clicks OK the Tree will update with the added model. Then the user can select the model and open it if desired. If the user has a model selected and attempts to add a new model that model will be added to the group in which the selected model resides.
When the user opens the model there may be errors about files not existing, this is to be expected when creating a new model. The Database expects the model to exist and attempt to load the model when the open button is pressed. The database is setup to allow user to reorganize the models on there system and to add models to the database that have been created without the database in previous User Interface execution. For this reason, the database no longer creates the files that the model loading code is trying to load before the loading sequence which causes the error messages.
Without the Database
As stated earlier, the database is no longer required in the use of the ACS-SASSI User Interface. If the user is only going to use a model for a single analysis the database will only add additional steps to the process. For that reason the user can directly use the prep file Input (INP command or the File>Input menu) or one of the converters to load a model into the User Interface. If the user uses this method to input the SAVE, RESUME & AFWRITE commands will not work because the Input file does not specify the model name and model path. (These command may actually run but there is no way to tell where the models will be written) If the user wishes to use any of this functionality There is a new command MDL which specifies the model name and path. Once the MDL command is used on a model the Save, Resume and Afwrite commands will work properly. The MDL command can be issued before or after the model input without problems.
The Input in Prep Echos all of the commands entered to the screen. This take a large amount of time and for any useful model that is not for validation the output overwhelms screen and will eliminate any chance of the user finding an error in the .pre file. Due to this fact is was decided that only comments, warning, error and the model information text will be echoed to the screen. This change in sped input of a .Pre file from 25-30 minutes using Prep to under 1 minute for the User Interface on the same computer.
If the user has create and saved the model in a previous User Interface run the user use the MDL to specify the model and then use the resume command to load the model. The internal storage format that the save and resume commands use is not compatible with ACS-SASS Prep the user cannot specify the location of a model save using Prep and load it using resume in the User Interface.
The save and resume and Afwrite commands work in the same way as they work in ACS-SASSI Prep. These command do not update the database. If the user wants to add a saved model to the database the user can use the Model Open popup window to modify the database and add the location of the saved model.
File Window, Command Entry and Command History
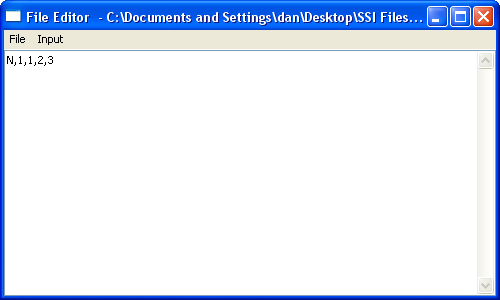
The original Prep had a window to open ASCII formatted files for view. This functionality was limited because a user could not edit a file that was being viewed inside of this window or copy this file with a different name or to a different location. This window has been replaced in User Interface with a text editor window that allow the user to view, edit and save files inside of the User Interface. This window behaves much like a simple text editor application but a user can connect the window to the command entry box Using the Input > Connect to Command Entry menu option. When the user selects this option all commands that do not cause an entry error will be recorded to this window as long as the text window remains open and no other windows are connected to the Command Entry.
The Command entry bar is similar to the original Prep instruction line however not the user can select previously entered commands by pressing the up and down arrows keys on the keyboard while the text cursor is blinking in the Command Entry bar
A user can now copy data from the Command History window and paste that data into another location. Information and warning text types have been added to the Output each one of these type has its own distinct user selectable color. Finally users can filter the output of the Command history if they desire by using the options in the View Menu.


